PuzzleMaster
Showing posts with label Route Finding. Show all posts

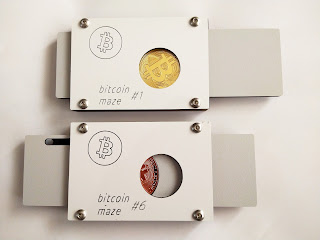
Bitcoin Maze #1 and #6
Posted on Feb 24, 2022 by Gabriel | 2 comments
Labels: , ,

(Click to Enlarge)

It's been almost seven years since I've reviewed a puzzle from Robrecht Louage. At the time, the 8 Stars Labyrinth was yet another great design that I had the pleasure to play with. Fast-forward seven years, and this time, Robrecht presents us with not only one puzzle, but six. This is the Bitcoin Maze, and it's already one of my favorites.

The first design (Bitcoin Maze #1) was entered at the 2021 Puzzle Design Competition. Trespa is Robrecht's material of choice for his puzzles, which has a solid feel in the hands unlike laser-cut wood, not to mention that the white appearance looks stunning. Michel van Ipenburg, who has collaborated in the past with Robrecht when they made Larva and Ladybird, came up with the idea for a series of six puzzles, and what an idea! Each puzzle feels different, and that's expected, since each one provides a different internal maze. #1 is supposed to be the easiest, while #6 is the hardest... In theory.

The goal of the puzzle is simple... There's a coin (a Bitcoin at that! - First time I held one in my hands) placed in a sliding platform enclosed within a frame with a labyrinth. Inside, however, there's a steel ball (or more than one) that's preventing the platform to go all the way out of the frame. Your task is to completely remove the coin from the puzzle. There's a position which looks like it's out, but you still can't remove the coin, so it needs just a bit more effort. The coin needs to be out of the puzzle.
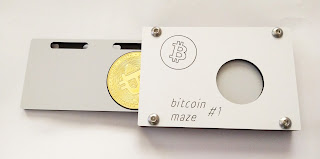
(Click to Enlarge)

The funny thing is, design #1 felt more difficult than #6. I started with #1, since I was told it was the easiest, but just couldn't solve it completely. The coin was at that position mentioned above, where it's almost out, but not quite. For a change of pace, I picked up #6 and to my surprise, I solved it within 5 minutes. Luck, perhaps? I kept trying with #1, but wasn't having much luck. It took me more than a hour fidgeting with it, trying to figure out the internal mechanism to finally remove the coin. I still haven't solved it a second time, but this is what makes these puzzles so good. You can try to solve them multiple times until it becomes second nature.

Difficulty may be relative when it comes to hidden mechanism puzzles. You can't see what's going on inside, after all. You have to rely on your other senses, and sometimes you may solve it quickly or more slowly. Either way, you get to feel like a safe cracker and that's what these puzzles give you. A wonderful experience like no other type of puzzle.

(Click to Enlarge)

Closing Comments:

The Bitcoin Maze is a great return to form by Robrecht Louage and I totally recommend it. Whether you're choosing just one or go for the whole series as a collector, you won't regret it. And you also get that shiny coin, so more reason to get it.

Availability: To get a copy of the Bitcoin Maze, please contact Robrecht at: rlouage(at)telenet(dot)be. Note that the e-mail is presented that way to avoid spam. You just need to change what's inside the brackets with a "@" and a "."

Cast Snow

Posted on May 26, 2020 by Gabriel | 0 comments
Labels: , , ,

(Click to Enlarge)
It's been a while since I reviewed one of my all time favorite puzzle series, the Hanayama Cast Puzzles. Taking the spotlight this time is the Cast Snow, designed by Kyoo Wong, who also designed the Cast U&U and Cast Rotor.

If you ever saw the shape of a snowflake, you know how unique and beautiful they can be. For that, the design of the Cast Snow alone is reason enough to get it. The Snow comes as a two-piece maze-type puzzle, where you need to navigate through multiple routes in order to separate the pieces.

This puzzle is simple enough to understand and despite being a level 2/6, considered pretty easy in terms of difficulty, I actually find it quite challenging. At first inspection, the holes at the extremities seem identical, but they can't be, because you need to separate the pieces through these holes. You'll find that each piece has a hole slightly larger in diameter than the others, but the trick is combining the only two larger holes with each other at the same time to solve it. Not so easy...

Surprisingly, I truly enjoyed solving this, as I was expecting a very easy challenge. It's not as frustrating as the higher difficulty Cast Puzzles, but you'll find it just as satisfying. It's one of those puzzles that even after you solve it, you can still do it multiple times, because it's not that easy to memorize the correct path. Just fidgeting with it is quite enjoyable.

(Click to Enlarge)
Closing Comments:

The Cast Snow is a really delightful puzzle. One of my favorites in recent years. Great design, nice challenge, smooth movement, very well built, just as we've come to expect from Hanayama. Highly recommended.

Availability: The Cast Snow is available at PuzzleMaster for $15.99 CAD. Also, check out many other interesting puzzle in the Cast family.


Labylong

Posted on Apr 14, 2020 by Gabriel | 0 comments
Labels: , , ,

(Click to Enlarge)
Jean Claude Constantin makes great maze puzzles and proof of that is in some of his earlier creations, like the Two Keys, the Blumenlaby, the Scheibenlaby or even the Labynary. Each one has its own unique characteristics which make them a joy to play with. The Labylong is another interesting design, made as a double-layer maze - Double the fun.

The Labylong is made from laser-cut wood and acrylic. Even though these are cheap materials, the puzzle itself is well built and feels sturdy. Measuring 10.4cm x 6.5cm (4.1" x 2.6"), the puzzle is small enough to carry along with you anywhere, and easy enough so that anyone can try it.

In this puzzle, a small metal sphere moves inside the two mazes, navigating through small holes that connect both mazes. Not all paths will lead to the exit, but that's expected in a good maze. Before making the sphere advance you should study the path ahead and see where it leads. Starting from the exit to the current position will help to avoid dead ends. To navigate the sphere you need to tilt the puzzle back and forth, since the mazes are stationary, and sometimes you need some dexterity to get the sphere where you want it.

Difficulty-wise, I was expecting a tougher challenge, since this is rated as a level 8/10, but I was able to solve it in just a few minutes. Or maybe I'm getting better at maze puzzles... If you've solved one of these, let me know how long it took you.

(Click to Enlarge)
Closing Comments:

The Labylong is a nice puzzle that even casual puzzlers will like it. If you found it too easy, try to solve it in a different orientation from the one you solved it, or try to go from the exit to the start. It's a fun puzzle to play with, but don't expect a difficult challenge here. Remember, not every puzzle needs to be difficult to be fun.

Availability: The Labylong is available at PuzzleMaster for $18.99CAD. Many more interesting puzzles from Constantin are waiting for you here.


C'est la Vie!

Posted on Feb 18, 2020 by Gabriel | 0 comments
Labels: , , ,

(Click to Enlarge)
If you like labyrinths, this puzzle is for you. C'est la Vie! by Jean Claude Constantin is a great puzzle where the goal is to find the correct path and free the metal ring. This is much harder than it appears, so you should proceed with caution, in case you get lost.

Made with laser-cut wood, C'est la Vie! is quite a big puzzle, measuring about 13cm in diameter. The designer not only created a challenging labyrinth to navigate, but also a beautiful pattern with curved shapes. Across the entire puzzle you see many indentations in the walls of the pattern, which serve as gateways for the metal ring to go from one section to another. Not all walls have one of these gateways, so you have to plan your moves strategically.

Curiously, this puzzle reminds of the popular Cast Plate by Nob Yoshigahara. Hanayama's version is a lot smaller, but the goal is quite similar, as you try to free a ring from a metal plate. Both puzzles are rather difficult, so I recommend any of them if you like a good challenge.

As you start to solve the puzzle you see the ring in its starting position at the center of the puzzle (Indicated by the letter S). The exit point is located at the left edge of the puzzle, but to get there you'll need to wander for a while, because the path is not a straight line. To get from one point to another you have to be constantly rotating the ring back and forth. Some points will feel a bit tight, as if it wasn't possible to go through there, but if you insist with a slight push the ring will surely pass through. Don't use excessive force, though, because the wood used in this puzzle is fragile and you could end up breaking the puzzle.

This is quite a difficult puzzle to solve. As an experienced puzzler, it took me over half an hour to solve it for the first time. Returning the ring to the starting position is probably a little easier, but still challenging.

(Click to Enlarge)
Closing Comments:

C'est la Vie! by Constantin is indeed a great puzzle and a must-have in any collection. It has a complex shape, but it's very easy to understand, so even a beginner can try to solve it. With a big size and a beautiful design this will sure capture anyone's attention wherever you take it.

Availability: The C'est la Vie! puzzle is available at PuzzleMaster for $31.99 CAD. Check out other puzzles by Constantin.


Cast Mobius

Posted on Nov 21, 2017 by Gabriel | 0 comments
Labels: , , , ,

(Click to Enlarge)
If there's one thing that I learned from almost 10 years of puzzling is to identify puzzles from the most notorious and prominent puzzle designers just by looking at them. That's what happened to one of the most recent Hanayama Cast Puzzles, the Mobius, designed by Oskar van Deventer from The Netherlands. If you don't know Oskar's creations, he is a master of mazes. Many of his puzzles involve you navigating something through a series of obstacles and paths, and the Cast Mobius is no different...well, a little different. The theme for the puzzle is "Belt" - The question is: Can you unbuckle it?

The design of the puzzle, as the name suggests, is inspired by the Möbius Strip, discovered by two mathematicians, August Ferdinand Möbius and Johann Benedict Listing. There's a ring locked inside the strip and many obstacles on its surface, which will make your job of releasing the ring that much harder. It is a level 4/6 puzzle, as rated by the manufacturer, so a moderate challenge awaits you.

The puzzle has the Hanayama distinctive feature of contrasting colors between the two pieces, with the strip being made of a material that looks like brass, and the ring made from plain old aluminum. Both pieces are well made and polished, a standard with all Hanayama puzzles.

It's hard to classify this puzzle solely as a 2D or a 3D maze. My take is that it's neither and both - Maybe the correct answer is 2.5D...

The ring has a diameter larger than the strip, so it can navigate in any direction, as long as it doesn't encounter any of the many obstacles lying around in the strip's surface. While attempting to solve the puzzle, you'll find obstacles on both sides of the strip, so you'll need to be constantly flipping the puzzle to see where you should go. Keep in mind that the exit point to release the ring is the same as the starting point.

To be honest, I didn't find this puzzle to be as challenging as the manufacturer makes it seem. The puzzle looks a little intimidating at first, but with a little trial and error you should be able to solve it in under 10 minutes or so. I think it's more a level 3 than a 4. Putting the ring back is not that challenging either. There are multiple ways to find a path to the exit, though. Some quicker than others, of course.

(Click to Enlarge)
Solution: You can download the solution for this puzzle here.

Closing Comments:

Even though I found the Cast Mobius a little easier than I would like, I still think it's a fun puzzle to play with, and a nice challenge, especially for anyone not that familiar with puzzles. It's one of the most impressive designs in the Hanayama series, and that's a great achievement by Oskar van Deventer.

Availability: PuzzleMaster is the way to go for everything Cast Puzzles, including the beautiful Cast Mobius. All the others in the series are also available here.


Black Jack

Posted on Jun 1, 2016 by Gabriel | 0 comments
Labels: , , ,

(Click to Enlarge)
Black Jack is yet another interesting design by Jean Claude Constantin that uses multiple mazes to really challenge our minds. Are you ready to conquer another difficult labyrinth by Constantin or are you going to get lost in the winding path?

The Black Jack - curiously one of the very few Constantin puzzles that don't have a German word for its name - is actually a four maze puzzle disguised as a double maze. It consists of two wooden platforms that slide back and forth, each one having two different mazes, one for each metal sphere to navigate around. Between the two platforms is another wooden sheet with a vertical path that lets the spheres go up or down. The only way to move the spheres is by sliding the platforms so there's always a path for them to move up or down. You solve the puzzle when you finally manage to guide the spheres all the way up the vertical path and remove them through the exit hole.

(Click to Enlarge)
This is quite a challenging puzzle because of the four mazes. For each sphere you have to maneuver two mazes simultaneously by flipping the puzzle and check your next move. When you pull on a platform both spheres need to have a clear path ahead or behind them, otherwise your move will be blocked.

The puzzle is classified as a level 9/10, and I mostly agree with it. Its mazes aren't all that difficult individually, but by combining them into two sets of two mazes it becomes a highly difficult challenge, one that will sure put your attention skills and patience to the test. I was able to solve this one within 20 minutes, after many failed attempts. There's no easy way to reset the puzzle to its starting position, so you'll have to do it all again backwards if you want to put it back again.

(Click to Enlarge)
Closing Comments:

The Black Jack by Constantin is an ambitious design with a rather complex concept. It's amazing how the designer could come up with this incredible puzzle. If you are a fan of mazes, I highly recommend this one.

Availability: The Black Jack puzzle is available at Brilliant Puzzles for $24.95 USD. You can also find many other great designs by Jean Claude Constantin.


8 Stars Labyrinth

Posted on Sep 23, 2015 by Gabriel | 0 comments
Labels: , ,

(Click to Enlarge)
Robrecht Louage has already accustomed us with very original designs year after year. As an avid IPP contestant, Robrecht always enters his new puzzles at the yearly International Puzzle Party, and this year's Ottawa event was no different. Even though it didn't earned any award at the competition, Robrecht's latest creation, the 8 Stars Labyrinth, deserves all the credit for its originality.

If you have followed the Belgian designer's work over the last few years, then you'll immediately notice something's missing in his new design. That's right, there's no coin to be freed this time around, but even so there's no excuse why you shouldn't try this one out. For lovers of labyrinths, mazes and hidden paths, the 8 Stars Labyrinth offers you a perilous journey through an obstacle-ridden trail, which only the most adventurous puzzlers will be able to overcome.

What remains common from other previous designs is the use of Trespa - An unusual but strong material made by combining Kraft paper and phenolic resin, resulting in this light-brown color seldom seen in any other puzzles, but in reality it's a great fit for an otherwise unusual puzzle itself. The top of the puzzle is covered with a semi-transparent polycarbonate sheet, which gives this foggy appearance to the labyrinth, as if you were roaming around in an eerie mist.

(Click to Enlarge) - Seen Edge-On
To start your journey, you must insert the small metal sphere in the "IN" hole found at the right of one of the sides. I believe the name of puzzle has something to do with the number of traps you can find scattered throughout the path, which is eight, if I'm not mistaken: right after you insert the sphere there's another one by the entrance, preventing you from going back in case you ever regret entering this fiendish labyrinth; following this welcoming committee is a blacked-out stretch of the path that doesn't let you see what type of trap you're facing. Here, like the other three similar traps that await you, you need to figure out how to advance to the next obstacle unscathed. Each of these four "black" traps is unique and present you with a different challenge, so proceed with caution as you approach them; farther in, you'll see another trap just like the one you encountered when you first entered the maze. You'll need some dexterity skills to pass through this one, but it shouldn't give you much trouble; one of the hardest parts of the puzzle is the hidden labyrinth at the bottom. Most of the path is covered by a plaque full of small holes that only let you see the sphere at certain points. You have to navigate through this maze mostly by instinct until you find the exit, just before passing through the last black trap; there's a final trap close to the exit, so you need to move the sphere slowly in order to avoid the pitfall ahead.

(Click to Enlarge)
I was intimidated at first by all the traps found in the puzzle, especially the black ones, where I didn't know what to expect. Turns out, it was easier than I thought and I was able to solve it within 10 minutes or so. The most challenging parts were the black trap in the middle (the second blacked-out stretch) and the hidden maze at the bottom. Some trial and error should take care of it, so if at first you don't succeed...

Closing Comments:

I must commend Robrecht for not being afraid to leave his comfort zone in terms of puzzle designing and to take a chance at trying different concepts other than the usual "free the coin". The effort certainly paid off, because the result, as you can see, is absolutely brilliant and the execution of the overall concept is, as always, perfect in every way.

Availability: To get a copy of the 8 Stars Labyrinth, please contact Robrecht at: rlouage(at)telenet(dot)be. Note that the e-mail is presented that way to avoid spam. You just need to change what's inside the brackets.


Escape From Alcatraz

Posted on Sep 26, 2013 by Gabriel | 0 comments
Labels: , , ,

(Click to Enlarge)
Robrecht Louage has accustomed us to his ingenious coin puzzle designs over the last few years, and this year's 33rd IPP Design Competition was no different. The latest addition to the family is the Escape From Alcatraz puzzle, a secret opening box with a hidden maze.

The design itself is one of the best from Robrecht. He used the back of a Belgium €1 coin, featuring King Albert II, and designed the puzzle around it, as if to imprison the King behind bars. Your task is to navigate the hidden maze and free the King from Alcatraz. The puzzle is made from fiberboard and is a bit smaller than its predecessors, measuring 9cm x 7.5cm (3.5" x 3").

(Click to Enlarge) - The Escape Begins
The concept can be compared to Rebrecht's Remove the Yolk, which featured a hidden maze as well, but even if you know all its steps by heart it won't be of much help for you to Escape From Alcatraz. The main reason is obvious, the two internal mazes are completely different. But how different, you ask? - It's hard to say, really. The only way you know they're different is by the moves you do with each other. From my experience with the two puzzles, I'd say the Yolk puzzle is a little harder than the Alcatraz, probably because the maze has a few more moves to free the coin, or just because I got better since then.

Looking at the description of the puzzle at IPP's website I discovered that one of the materials used, besides fiberboard and steel balls, is a magnet. I only knew about this after I had solved it, so I was a bit surprised, because I would've never figure out a magnet was present. Maybe that explains why it's so tricky to navigate the maze, since you never know exactly where the steel balls - or just ball - are. The magnet may be preventing the balls from moving freely.

(Click to Enlarge) - Escape Imminent
The first time I tried to Escape From Alcatraz it took me about 15 minutes. The platform that holds the coin has about 5 steps. In other words, it will slide off the frame in 5 different stages, with the coin being closer to the exit point with every step - An alternative name could be "5 Steps Invisible Lock". Strangely, it took me much less time to get the coin back at the starting position - about a minute or two. I was expecting it to be equally challenging, but I was glad it didn't. After several successful solves I can now solve it in just a few seconds. I think I pretty much learned all the basic moves, but I'm still not certain what exactly is going on inside that mechanism. I think it's just part of the fun in solving it.

(Click to Enlarge) - Escape Successful
Closing Comments:

Escape From Alcatraz is yet another brilliant puzzle from Robrecht Louage. It may not have won an award at this year's IPP, but the design alone is deserving of recognition. The best part about it is that it keeps you guessing and analyzing it in further detail. It may be a while before you can figure out its mechanism completely. I can't wait to find out what Robrecht has in store for us next year.

Availability: To order a copy of Escape From Alcatraz, you can contact Robrecht directly.


Safe

Posted on Jun 7, 2013 by Gabriel | 7 comments
Labels: , , ,

(Click to Enlarge)
I'm starting to become a fan of Siebenstein-Spiele. This company makes gorgeous wooden puzzles, besides board games, that somehow resemble Jean Claude Constantin puzzles. You all know how I love JCC's puzzles, so understandably I'm loving Siebenstein-Spiele's too. I don't have many of them right now, as the one you see here, the Safe, is just the second that I'm aware of I currently own. The first one was Auf dem Holzweg.

The Safe, designed by Jürgen Reiche, has got to be one of the most fascinating looking puzzles I've seen in a while. Looking like some ingenious measure instrument straight out of the Discoveries era, the Safe is as hard as it looks. The puzzle is built with a mix of wood and acrylic, and you can actually see some markings on the top acrylic layer, as if to indicate some type of measuring. It really is intended to look like an instrument from past centuries. Something overly complex, too difficult for anyone other than scholars to understand.

The puzzle is presented with a 1 Euro coin at the top layer which is trapped inside a maze. You need to rotate the two middle layers, one acrylic and one wood - very clever, otherwise you wouldn't see the maze when they overlapped - in order to free the coin at the bottom layer. So there are four layers, but only the two middle ones can rotate. Each layer has a hole the size of the coin and each of them has to be aligned with the immediate top layer for the coin to drop. You have the coin free when you finally manage to align the top bottom layers.

To make your stealing from the Safe a tad little harder, there are two pins in the middle that move horizontally and cross the layers from top to bottom. You have to be constantly moving these pins back and forth to be able to align the maze layers. They will block many of your movements, so be prepared for some frustrating moments.

I've seen this puzzle classified in different sites and the conclusion I've got is that it's very difficult to solve. I've seen it being rated as a 10/10, and although it took me several sessions to solve it with a total of 2 hours approximately, I think it's an 8 or maybe a 9 at the most. Why not 10? - Well, because while it might be time consuming, it's just a maze, and you can see all of the steps you're doing at all times. It's not a Revomaze. If you have a little patience, you will eventually solve it. Now, to return the coin to its starting position, that's another problem. I'm still waiting for my patience to be fully restored...

(Click to Enlarge)
Closing Comments:

The Safe is easily one of the best puzzles from Siebenstein-Spiele. I only own two at the moment, but I've seen several of them around. They're all great puzzles, but this one has something special. Its design is so original, unlike anything I've ever seen. I'm not sure if this was featured in any of the past IPP Design Competitions, but it truly deserves recognition.

Availability: You can find the Safe at Sloyd.fi for €25.


Zahnradlaby (Double Gear Maze)

Posted on Apr 19, 2013 by Gabriel | 4 comments
Labels: , , ,

(Click to Enlarge)
Zahnradlaby (a.k.a. Double Gear Maze) by Jean Claude Constantin is a superb puzzle that begs for your attention. Reminiscent of those contraptions from the Leonardo da Vinci era, this striking looking puzzle is just as hard as it looks, and some more.

The Double Gear Maze is a variation of another much simpler Constantin design, the Gear Maze. Besides the obvious differences with the two mazes, the Double Gear Maze actually features smaller labyrinths, with three pathways, whereas the Gear Maze features four pathways. Although I haven't tried the simpler design, I reckon it's safe to assume the Zahnradlaby is much harder to solve.

The puzzle is made from acrylic to cover the mazes and the rest from wood. The mechanism, as expected from a Constantin puzzle, works very well. Occasionally, the balls might get jammed under the top maze, but to avoid that just make sure you tilt the puzzle in the direction of the ball's movement. The size of the puzzle is also pretty good, measuring 20cm in diameter (7.9").

Both gears have two layers with different labyrinths: the bottom one, which is stationary, and the top one, a moving maze which you can rotate back and forth to create a unique path for your ball bearing. By constantly rotating both gears in sync, the goal is to free the two ball bearings at the same time. I see two circle marks in both gears that should be indicating the solved position, but with the gears' positions it's just impossible to get both holes above these marks at the same time... Unless the intention of the designer was to actually solve one at a time.

Since you're solving both mazes simultaneously, you have to take into account that every move you do on one maze has an effect on the other one, and vice-versa. As you'll be constantly hitting dead-ends, you have to figure out where you need to put the ball bearing on one maze so the other ball can proceed. This constant motion of back and forth is quite challenging, because at times you think you're getting closer to the goal with one ball, but the other one requires you to go back. It's a little frustrating, to say the least.

(Click to Enlarge)
Closing Comments:

I loved the look of the Double Gear Maze. The concept is fantastic and it has the right level of difficulty. I can see why Constantin made these mazes shorter than the Gear Maze, as it would've been a tad too difficult.

Availability: You can find the Double Gear Maze at PuzzleMaster for about $46.99 CAD.

Links:


1€ Labyrinth Puzzle

Posted on Jan 24, 2013 by Gabriel | 3 comments
Labels: , ,

(Click to Enlarge)
Last year, also in January, I reviewed two puzzles from Belgian puzzle designer Robrecht Louage: Remove the Yolk and 4 Steps Visible Lock (winner of IPP 2011 Jury Grand Prize). This year, Robrecht participated again in the 32nd IPP and his contribution was the 1€ Labyrinth Puzzle. It didn't win an award, but it doesn't make it less impressive than its predecessors.

I loved his previous two puzzles, so I was obviously eager to try his latest design. Suffice it to say, I was as impressed as I was the first time around. The quality and design of the puzzle are perfect, as well as its solving experience.

The materials used in the 1€ Labyrinth Puzzle are pretty much the same, with trespa and acrylic providing a great visual appearance. The trespa frame is relatively small with dimensions of 10 x 7cm (3.9" x 2.8"), although the acrylic platform extends its total length to 18.5cm (7.3").

There are a couple of similarities between the 1€ Labyrinth Puzzle and the 4 Steps Visible Lock: both have some sort of maze that you have to navigate with steel balls by pushing and pulling the acrylic platform, until you're able to free the coin. While you could see the whole maze in the Visible Lock (not quite, but still 99% of it), you can only see part of it in the Labyrinth Puzzle, with the rest being up to your puzzler intuition.

In all fairness, you only need to see what's shown of the maze, as you wouldn't be able to figure out the final part right away, even if you could see the whole maze. That's the beauty of it, though. The final part is always the trickiest. If you solved the Visible Lock, you'll know what I'm talking about.

The Labyrinth Puzzle had me "puzzled" for a while. It didn't take me long to solve it, around half and hour or so, but for the most part, I thought I had it almost solved, when in reality I was very far from it. You can see in the picture below that the coin is almost at the end of the maze, but it's not enough to remove it... And here lies the genius of the puzzle, having you believe you're almost there and a feeling that it's just a little more effort.

(Click to Enlarge) - Almost there... Or am I?
In fact, I stumbled on the solution almost by accident when I was holding the puzzle at a different position (I'm not saying which one). I was very surprised to see the coin free in such an unexpected way. I won't go into more details about the solution, because I believe that if you find out for yourself, the feeling will be much more rewarding. I'll just say that it'll leave a big smile on your face when you solve it. It's definitely worth it.

(Click to Enlarge) - Solved
Closing Comments:

If you own any of Robrecht's puzzles, then you're gonna love the 1€ Labyrinth Puzzle. It has everything you want in a puzzle - Great design, superb quality, and above all, a wonderful solving experience with that a-ha moment as the icing on top.

Availability: You can contact Robrecht Louage directly at his e-mail "rlouage(at)telenet(dot)be" to get a copy of his 1€ Labyrinth Puzzle or to ask for availability on some of his other great designs.


Cast Plate (継)

Posted on May 17, 2012 by Gabriel | 0 comments
Labels: , , ,

(Click to Enlarge)
Another one of Hanayama's revitalized puzzles, the Cast Plate is an update of an old design, found at Jerry Slocum's collection, by the talented hand of Nob Yoshigahara. It was first released in February 2005 and the key word is "succession".

The Cast Plate is essentially a disk with 23 holes scattered around its surface and a disk with a gap that allows it for travelling around these holes, sort of like a maze. The object is to remove the ring from the plate and then return it to the "Goal" position.

Prior to know about the Cast Plate existence, I purchase a few years ago a box full of vintage puzzles, and in there was this puzzle bearing a striking resemblance to the Plate's concept. As you can see from the photo below, it's about half its size and it's made in aluminum, which is much cheaper to produce. I'm not sure if the old copy I have is the real thing, but judging from the appearance of the box that came with it, it sure looks like it's from a few decades ago. The older version also has a starting position. Here's the one from Jerry Slocum's collection (Disc and Ring Maze), the one that inspired Nob for the updated version.

(Click to Enlarge) - Comparison between a vintage maze puzzle (left) and the Cast Plate (right)

Even though the Cast Plate should be a modern version, it still looks like a vintage puzzle, and in terms of quality it leaves much to be desired. The ring often gets jammed and stuck in the holes, needing some force to free it. The disc itself looks great, though. It was very well polished and has a clean smooth surface, although not flat. Maybe if the holes were a little more wide or the ring a little more thinner, the problem would be easily fixed.

Hanayama rates the Cast Plate as a 2/6 puzzle, although in my opinion it's no harder than any of the level 1 puzzles. As far as I'm concerned, very little skill is needed to solve it. As the key word suggests, a succession of moves will suffice to eventually free the ring. Some people might solve it faster than others, depending on how many dead ends you encounter on the way, but in the end it's just a question of trial and error, luck and intuition. After you've solved it, you can try again to see how much of the path you still remember and get a faster solving time.

After you make the first moves, it will be easier to see where you can place the ring next, as the distance between the holes becomes predictable. You can also tackle this challenge backwards by imagining the ring entering the disc and work your way to the "Goal" position.

Note: At the back of the disc you can read "Nob's Last Present". Knowing that Mr. Nob passed away in 2004, it's certainly related to the last project he did for Hanayama.

(Click to Enlarge)

Closing Comments:

The Cast Plate is not Hanayama's best work, but it's still a nice puzzle. Also worth praising is the fact that they try to give new life to old puzzles, making them widely accessible again for people that otherwise wouldn't have the opportunity to play with them.

Availability: The Cast Plate came from the Finnish store Sloyd.fi and it's available for about €10 (worldwide shipping available). For all the other puzzles in the Cast Series, check out their Hanayama page.

Solution: You can order the solution for free in the puzzle's description page at Sloyd's.

Links:

Hanayama Cast (in English) - Very useful website in English, with plenty of information on all things Cast.

Hanayama's Factory Visit (Many thanks to Roxanne Wong for sharing these pictures)


Two Keys

Posted on Feb 28, 2012 by Gabriel | 2 comments
Labels: , , ,


Share

(Click to Enlarge)

Today, I have another Jean Claude Constantin puzzle for review, the Two Keys. It's starting to become a trend... And I still have several more of his designs waiting to be reviewed, so do stay tuned.

The Two Keys is a Maze or Route-Finding puzzle, or double maze to be more precise, and your task is to get the pin from its starting point to the end and remove it. This would have been a pretty simple challenge had the second maze, which is very different, not been there to complicate things. To navigate around the maze you need to slide the top platform left or right according to the movement you want to perform, so that both mazes have a common pathway.

The puzzle is relatively small, measuring about 10cm x 6.5cm (3.94" x 2.56") and it's laser-cut from plywood. Adding for a very nice finishing touch are two acrylic pieces placed at both top and bottom.

(Click to Enlarge)

The difficulty is a bit harder than I was expecting, because the solution is not so straightforward as you'd think. I had to go back and forth a few times, facing a couple of dead-ends in between, before I was able to find the right path. PuzzleMaster rates it at 5/10, the easiest, but even though I was able to solve it in about 10 minutes, doesn't change the fact that it's still a complex design and I believe more casual puzzlers will struggle to figure it out.

I got the Two Keys puzzle from PuzzleMaster. Constantin has a similar design with steel balls and mazes, called Black Jack, although it's a sequential puzzle and I believe, a lot more difficult. While you're at it, why not try the Kugellager? - Over 1200 moves to solve...

(Click to Enlarge)

Closing Comments:

If you're a regular reader of my reviews, then you know that I'm a big fan of Constantin's designs, and the Two Keys is certainly not an exception. While it's not a new concept (Oskar's Medallion and Cast L'œuf are another two examples), the design is very well done and I can recommend it to any maze enthusiast.

Links:


Remove The Yolk

Posted on Jan 13, 2012 by Gabriel | 2 comments
Labels: , ,


Share
(Click to Enlarge)

A few days ago, I reviewed Robrecht Louage's 4 Steps Visible Lock and I was very impressed with the concept of removing a coin from the puzzle. It's like getting a reward for solving it... 

Today, I have another one of Robrecht's puzzles to review and this one requires to remove a coin as well. How does it compare to the previous puzzle? - Continue reading to find out.

Remove the Yolk was entered at the 2010 30th IPP Design Competition and it's about the same size as the 4SVL, also built with trespa and manufactured by Robrecht himself. The appearance of the puzzle is made to resemble an egg and the coin represents the yolk. The goal is to remove the coin, but for that you have to work out how a hidden locking mechanism works.

The mechanism consists of what appears to be small steel balls, judging by the rattling inside, and they lock some movements depending on the way you're holding it. By tilting the puzzle at different angles, it will make some of the balls inside shift back and forth, allowing this way the sliding platform with the coin to move.

(Click to Enlarge)

The big difference between the Remove the Yolk and the 4 Steps Visible Lock is that the latter had most of the mechanism visible and you knew what you were doing, despite the last step being a "blind step". In this puzzle, however,  there's no visual perception of what's going on inside, so you have to rely only on your hearing and your sense of touch.

I solved this puzzle after the 4SVL one, and my impression is that it's a bit harder. It took me about an hour to get the coin out, and even when I solved it, I wasn't sure what I had done specifically to accomplish that. It does have its advantages, because since you don't know exactly how to do it, you can solve it multiple times and still enjoy it, until eventually you figure out the exact process to get it opened.

I found a YouTube video showing how to solve it, and after seeing it I had another try and it did work. If you have one and had enough of frustration, you can see the video here.

(Click to Enlarge)

Closing Comments:

After solving two of Robrecht Louage's puzzles, I can honestly say that I've became a fan of his work and I will look forward to seeing other designs by him. He also entered in other two previous IPP's with La Cerradura Doble in 2008 and La Cerradura 3D in 2009. I'm very curious to see what he prepared for his next puzzle entry at this year's IPP.

If you'd like to buy a copy of the Remove the Yolk puzzle, contact Robrecht Louage.

4 Steps Visible Lock

Posted on Jan 9, 2012 by Gabriel | 0 comments
Labels: , ,


Share

(Click to Enlarge)

Robrecht Louage is a puzzle designer from Belgium. His latest design, the 4 Steps Visible Lock, has earned him the Jury Grand Prize at the 31st IPP Puzzle Design Competirion, held last year in Berlin, Germany.

The puzzle is made of acrylic and a material called trespa. There are four steel balls, two for each different size and it measures 11.5cm Length x 6.5cm Width x 2.5cm Height (4.53"x2.56"x0.98").

The 4 Visual Tricks Puzzle, as it was first called and suggested by its name, consists of four distinct movements that keep a coin well locked inside. Your objective, as you might have guessed by now, is to slide the platform enough, so that it reaches the hole found at the right, to be able to remove the 1 Euro coin.

The beauty of the 4 Steps Visible Lock is that there are actually 5 steps you need to complete, in order to solve it, but the 5th and last one is hidden... And that's all I can say about this (un)visible step, without spoiling the solution too much.

As you first pick up the puzzle, you'll notice that the first step is a two-part locking mechanism done by a couple of small steel cylinders, located at the top and bottom of the sliding platform. The intriguing part is that, if you try to get one of the cylinders out of the way, by tilting the puzzle at the opposite direction, the other one falls into place and locks the mechanism again. You have to be patient and come up with a strategy to free both of them, at the same time and get to next step. After you overcome the first part, the three following steps are easier to achieve.

(Click to Enlarge) - Top View

The second step is related to the larger couple of steel balls at the bottom. As you tilt the puzzle to get each ball to their specific spot, they tend to follow each other, because of the nature of the movement you're trying to do. This is not that hard to achieve though.

The third and fourth steps are similar and are interconnected, as they need to be done at the same time. The two paths are executed by the two smaller steel balls and are easily accomplished.

The tricky part however, besides the first one, where you had the cylinders, is the one that you can't really see and when you finally solve it, it's when you realize its whole purpose and use for the actual coin.

Closing Comments:

After solving the 4 Steps Visible Lock, I can understand the reason why it was awarded the Jury Grand Prize at the 31st IPP. The concept is brilliant and the elegant and attractive design is what makes it so appealing to a puzzle lover.

To get a copy, you can contact Robrecht Louage by e-mail at "rlouage(at)telenet(dot)be".

(Click to Enlarge) - Solved

Related Posts Plugin for WordPress, Blogger...